Adding members

There are two ways to add members to a class:

  • For students who are new to Writelike and Frankenstories, add them directly to the class and give them their unique student code to log in with.  
  • For students who already have a Writelike or Frankenstories account, just get them to log in and enter the class code on their My Lessons page.

We're working on making the Writelike student register experience smoother, but in the meantime if you're planning to use Frankenstories as well as Writelike, it might be quicker to get your students to register there rather than adding them all manually. Just give them the class code and tell them to register as a student at frankenstories.org. They'll be given their unique 6-digit login code and be automatically added to your class.

Students log in using unique 6-digit student codes.

You can create student codes by typing names into Writelike or by uploading a first name/last name class roll as a CSV in My Lessons > Manage Class > Members > Use Student Codes.

Screenshot Student Codes

You can then print a list of student names and codes, and distribute these to students:

Screenshot How to Print Student Codes

When a student logs in with the code you've provided, they will have access to your class.

CSV upload is usually faster than typing student names one at a time.

If you're unfamiliar with the term, CSV stands for Comma Separated Values, and it refers to the simplest, most no-frills way of presenting a table of data.

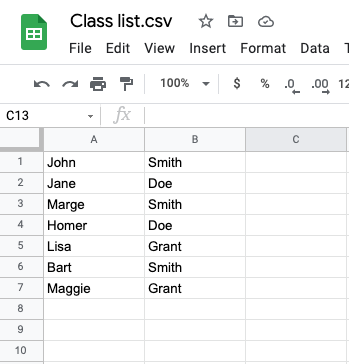
A CSV class list should look like this in Excel or Google Sheets:

Screenshot of CSV in Google Sheets

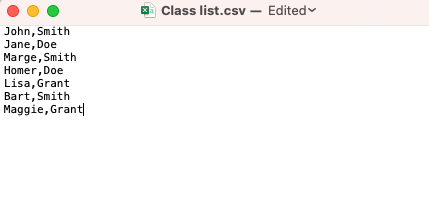
Or like this in a text editor:

Screenshot of a CSV

Super simple!

  • Notice it's a list of first name and last name only.
    • In the spreadsheet version there are no other columns of data and no row headings.
    • In the text file version there are no labels, spaces, or extra paragraph breaks.
  • The file can be named anything, so long as it ends with a .csv extension.

How do I make one?

The specific steps will vary depending on how your school stores class rolls, but the basic steps will be something like:

  1. Export a class roll as a CSV from your classroom management system.
  2. Open that file in Excel or Google Sheets and delete any extraneous columns, leaving only first name and last name, in that order.
  3. Delete any column headings.
  4. Save or export the list as a CSV again, if necessary.
  5. Upload to Writelike.

Whoever has a student code will have access to that account.

No personal information is stored in the account apart from whatever you entered as student name.

However, student work can be modified or deleted, and comments can be made on other students' work.

If a student code is lost or compromised, you can reset it by clicking the menu button next to the student's name and selecting Reset student code.

Teaching with Writelike How to Reset Student Codes

Students who already have an account can join additional classes by using the relevant class code.

  1. Provide the relevant class code.
  2. Ask the student to enter the code into the Class Code field in My Lessons.
  3. They will be added to the new class.

They will remain a member of the old class and retain their work history.

Note that anyone with the class code can become a member.

If the code gets shared too widely and unwanted guests show up, you can generate a new code by going to the class page and clicking Edit Class > Regenerate class code.

Screenshot How to Regenerate Group Codes

You can remove members from a class by clicking the menu next to their name. (Members can also remove themselves if you have enabled this feature under Edit Class.)